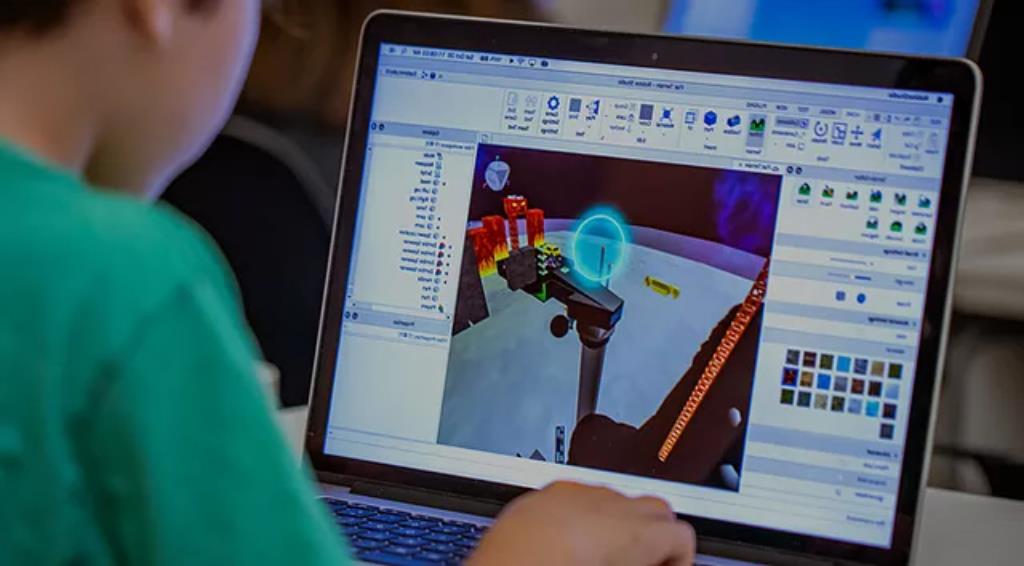
Roblox Studio is an editing program created by Roblox in order to provide a variety of coding and creation tools for game development for Roblox.
Roblox Studio Overview
For all those who are not very familiar with Roblox Studio we explain below the most important parameters that you have to know and what functions apply each of them.
- File
- New Place – Open a New Place
- Open Place – Opens an existing place on your computer. Go to its place, click on it and then click “Open”.
- Close Place – Closes the current open place.
- Save – Saves the current open place. If the location does not have a location defined on your computer, it will prompt you for a location.
- Save As – Saves the current open place, but always requests a location.
- Publish to Roblox – After clicking here, choose a place to upgrade. Your location on the Roblox site will be identical to your workspace area.
- Save Selection as Model – Allows you to save the currently selected block(s) on your computer. Location requests.
- Distribute Selection as Model – Allows you to distribute as of now chose blocks as a free model on the Roblox site, or supplant a current model with your choice.
- Print – Prints what display on the screen to a printer of your choice.
- Print-Preview – Displays what is show on your screen.
- Print Settings – Adjust the settings for printing from Roblox.
- Recent Access Places – Links to open places you’ve recently opened.
- Exit – Salir de Roblox Studio.
Roblox Studio Home
- Select – Selects a part/model. Note that very large parts cannot move. Moves a part/model, but can only move in 6 preset directions.
- Scale – Resize parts only. You can only scale in 6 preset directions.
- Rotate – Rotates a part.
- Transform – Combines all the above tools.
Model in Roblox Studio
- Select – Selects a part/model. Note that very large parts cannot move with this tool. Moves a part/model, but can only move in 6 preset directions.
- Scale – Resize parts only. You can only scale in 6 preset directions.
- Rotate – Rotates a part.
- Transform – Combines all the above tools.
- Anchor – Does not allow an object to be moved by an environmental force (The person editing the place is not an environmental force).
- Color – Changes a part so that it has that color.
- Material – Changes a material.
- Join – Merges the parts to create a join part.
- Negative – Converts the selected part to a negative part. When you join with another part, it will subtract from that part and create a join.
- Separate – Separates the parts of the joint.
Roblox Studio Surface
Soft – Applies the “smooth” surface to a facet of a block. The smooth surface does not secure one block to another block.
Glue – Applies the “glue” to a facet of a block. The surface of the glue joins one block with another but will break after a certain amount of tension applied by a character or explosion unless anchored.
Weld – Applies the “weld” surface to an aspect of a square. The weld surface joins one block with another and can only be broken by explosions if it is not anchored.
Asparagus – Applies the “asparagus” surface to a facet of a block. The surface of the island only joins the inlet surfaces. Gaskets can only be broken by explosions unless they are anchored.

Input – Applies the “input” surface to a facet of a block. The input surface is only joined to the surfaces of the asparagus. Gaskets can only be broken by explosions unless they are anchored.
Universal – Applies the “universal” surface to a facet of a block. The universal surface is joined to both asparagus and entrances. Explosions can only broke Gaskets unless they are anchored.
Hinge – Applies the surface of the “hinge” to a facet of a block. Anything on the surface of a hinge, except glued or welded blocks, can rotate freely on the hinge until the joints break.
Engine – Applies the “motor” surface to a facet of a block. Anything on the engine surface, except glued or welded blocks, will constantly rotate on the engine until the joints break.
Ground
- Generate – Generates random terrain.
- Add – Adds terrain.
- Subtract – Removes the terrain.
- Paint – Paint the terrain.
- Grow – Add the terrain in a smoother way.
- Smooth – Smooth the hard edges. This will create “peaks”, which you can get rid of using the erosion tool.
- Regions – An easy option to add, copy, paste, delete, select, move, resize, rotate and fill the terrain.
Roblox Studio Plugins
A place to manage plugins and access plugin tools. They are useful tools to help you create a game.
Toolbox on Roblox Studio
The Toolbox on Roblox Studio is one of the most valuable assets for newcomers to Roblox Studio. If you’re new to the interface, the toolbox contains everything you need. From a simple block to a complicated jet aircraft, the toolbox contains everything users have uploaded to Roblox.
To use the toolbox, click the Toolbox option, then click the drop-down menu at the top of the toolbox. You can navigate to which category, then which object you want to select, and then click the object. The object appears in the workspace.
In addition, clicking “Inventory” will have categories for publicly made models and decals, as well as models you’ve made on your own.
Roblox Studio Explorer
Roblox Studio Explorer is an important tool in Roblox, especially when its place contains Complex Hierarchy and multiple models. When you open Explorer, you will find a toolbar that lists the hierarchy of the place. All objects in the place are typically stored in the Workspace.
Properties in Roblox Studio
Opening the Roblox Studio menu will allow you to view/edit the properties of the object you selected, for example, if you select a brick, the menu displays the color, material, reflectance value, transparency value of the brick, as well as other properties.
Exit
The output menu is where script errors and print messages will be displayed. It will always show the location of the error and what the error is.
Shortcuts Part One (Computer)
- New Place (Ctrl+N) – Creates a new place in a new window.
- Open Place (Ctrl+O) – Allows you to search for a place on your computer and then open it. To open a place, click this button, locate the folder where it is located on your computer, click on the place and click “Open”.
- Save Place (Ctrl+S) – Allows you to save the place you currently have open.
- Select Tool (Ctrl+1) – Toggles the selected tool.
- Scroll Tool (Ctrl+2) – Toggles the scroll tool.
- Scale Tool (Ctrl+3) – Toggles the scale tool.
- Rotate Tool (Ctrl+4) – Changes the rotation tool.
- Transform Tool (Ctrl+5) – Changes the transform tool.
- Cut (Ctrl+X) – Takes the selected object, deletes it, and allows it to stick to your workspace infinitely.
- Copy (Ctrl+C) – Takes the selected object and allows it to paste into your workspace infinitely.
- Paste (Ctrl+V) – You must have copied and cut before using – Take the cut/copy object and place it in the workspace when you click. It can use infinitely after copying/cutting.
- Paste to (Ctrl+SHIFT+V) – Takes the cut/copied objects and inserts them into the selected object.
Shortcuts Part Two (computer)
- Duplicate (CTRL+D) – Duplicates what is currently selecting. This is useful if you don’t want to keep spawning parts and anchoring them. You cannot paste objects that have been cut/copied.
- Undo (Ctrl+Z) – Undoes the action you just performed. The drop-down menu is useless at this time.
- Redo (Ctrl+Y) – Redoes the action you just performed. The drop-down menu is useless at this time.
- Group (Ctrl+G) – Allows you to group the selected objects and lock the grouping so that they can all be selected and moved together when needed.
- Ungroup (Ctrl+U) – Breaks the connection of a selected group of objects.
- Change Collisions (Ctrl+SHIFT+C) – Changes whether part collisions are on or off. If enabled, you cannot move parts through other objects.
- Rotate (Ctrl+R) – Rotates the selected object on a vertical axis.
- Tilt (Ctrl+T) – Rotates the selected part on a horizontal axis.
- Move Up (E) – Moves the camera up.
- Move Down (Q) – Moves the camera down.
- Detach (Ctrl+SHIFT+U) – Separates the selected part(s).
Local/Global Space (CTRL+L) – Changes the way the currently selected object will be moved. Global Space will allow you to move the object along the world’s X axis, Y axis, and Z axis, while Local Space will move along the object’s X, Y, or Z axis. Keyboard shortcuts can be viewed and changed at any time in Advanced > file > Customize Shortcuts.
Test
Whether you don’t have scripts, or your entire site is scheduled, you’ll want to try it out in the Studio so you can detect and eliminate existing bugs in your game before launching it to the public, increasing players’ respect for you. There are three options to try, located in the ‘Test’ column:
Play – Take your character to a place of relief. If there are no spawning places on the map, the character is spawned in the center of the map.
Play Here – Wake up your character where your camera is currently.
Run – The place moves but without the character scrolling.
Publication
Once you’ve finished editing and testing your site, do you want to upload it to Roblox so that other people and users can play it?
Go to File > Publish Place to Roblox and follow the steps to publish it. Or then again if your game is as of now distributed, click “Distribute to Roblox” here. Depending on the size of your site and your upload speed to the Internet, it may take 5 to 30 seconds or more to publish. Your place is now loaded into Roblox for users to play on.
Don`t missed this article How to play Roblox as a beginner
Do you like this article? I encourage you to share on social networks to be aware of new tips and guides that we will be published.


